


 การประยุกต์ใช้งาน NodeMCU ESP8266
เขียนโดย ดร.จักรกฤษณ์ แสงแก้ว วันที่ 4 ธันวาคม 2561
 บทนำ
บทนำ
ในอดีตการเรียนรู้ไมโครคอนโทรลเลอร์ทำได้ยากเพราะอุปกรณ์ต่าง ๆ มีราคาแพง อีกทั้งต้องซื้อคอมไพล์เลอร์อีกด้วย ทำให้จำกัดเฉพาะกลุ่มคนบางกลุ่ม แต่สำหรับวันนี้เราอยู่ในยุคโลกาภิวัฒน์ ที่ข้อมูลข่าวสารสามารถส่งถึงกันได้เพียงเสี้ยววินาที โดยวันนี้เป็นการศึกษาการใช้งาน NodeMCU ราคา 61 บาท ซื้อมาจาก Shopee.com จำนวน 2 ตัว ค่าจัดส่ง 30 บาท ครับ

- ไมโครโปรเซสเซอร์ คือ หน่วยประมวลผลกลาง เวลาจะใช้งานต้องหาเมนบอร์ด แรม และอุปกรณ์ Input Output มาต่อและยังต้องติดตั้งระบบปฏิบัติการด้วยจึงใช้งานได้
- ไมโครคอนโทรลเลอร์ คือ ไอซีดิจิทัลที่สามารถทำงานด้วยตัวมันเอง โดยในตัวไมโครคอนโทรลเลอร์จะมีหน่วยประมวลผล หน่วยความจำ และหน่วยอินพุตเอาพุต (GPIO : General Purpose Input Output) เวลาจะใช้งานต้องเขียนโปรแกรม เรียกว่า "การโปรแกรม"

นับตั้งแต่โปรแกรม Arduino ออกมาทำให้เราท่านสามารถเขียนโปรแกรมควบคุมอุปกรณ์ไมโครคอนโทรเลอร์ได้โดยไม่ต้องเสียค่าใช้จ่ายซอฟต์แวร์
 สั่งซื้อ NodeMCU ESP8266 จาก Shopee.com

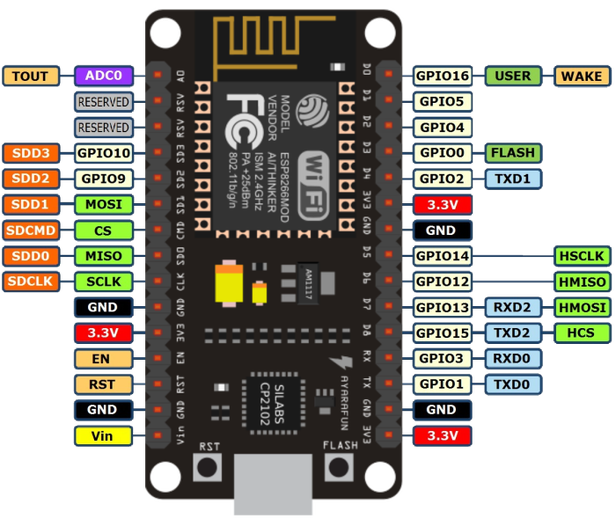
 ตำแหน่งขาภายใน ESP8266

 เตรียมความพร้อมก่อนใช้งาน
1. ดาวน์โหลด Arduino
2. เปิดโปรแกรม Arduino
2.1 เลือก File -> Preference
   - กำหนด http://arduino.esp8266.com/versions/2.5.0/package_esp8266com_index.json
   - ยกเลิกการเลือก Aggressively cache compiled core (ไม่เลือก)
3. เลือก Tools
    - Upload speed 115200 bps
    - Board ให้เลือก NodeMCU 1.0 (ESP-12E Module)
    - Programmer เลือก USBTinyISP
    - PORT -> เลือก Comport (RS-232)
 เขียนโปรแกรมไฟกระพริบที่ขา GPIO 14
1. เขียนโค๊ดและโปรแกรมลง ESP 8266
int ledPin = 14;

void setup() {
pinMode(ledPin, OUTPUT);
}

void loop() {
digitalWrite(ledPin, HIGH);
delay(500);
digitalWrite(ledPin, LOW);
delay(500);
}
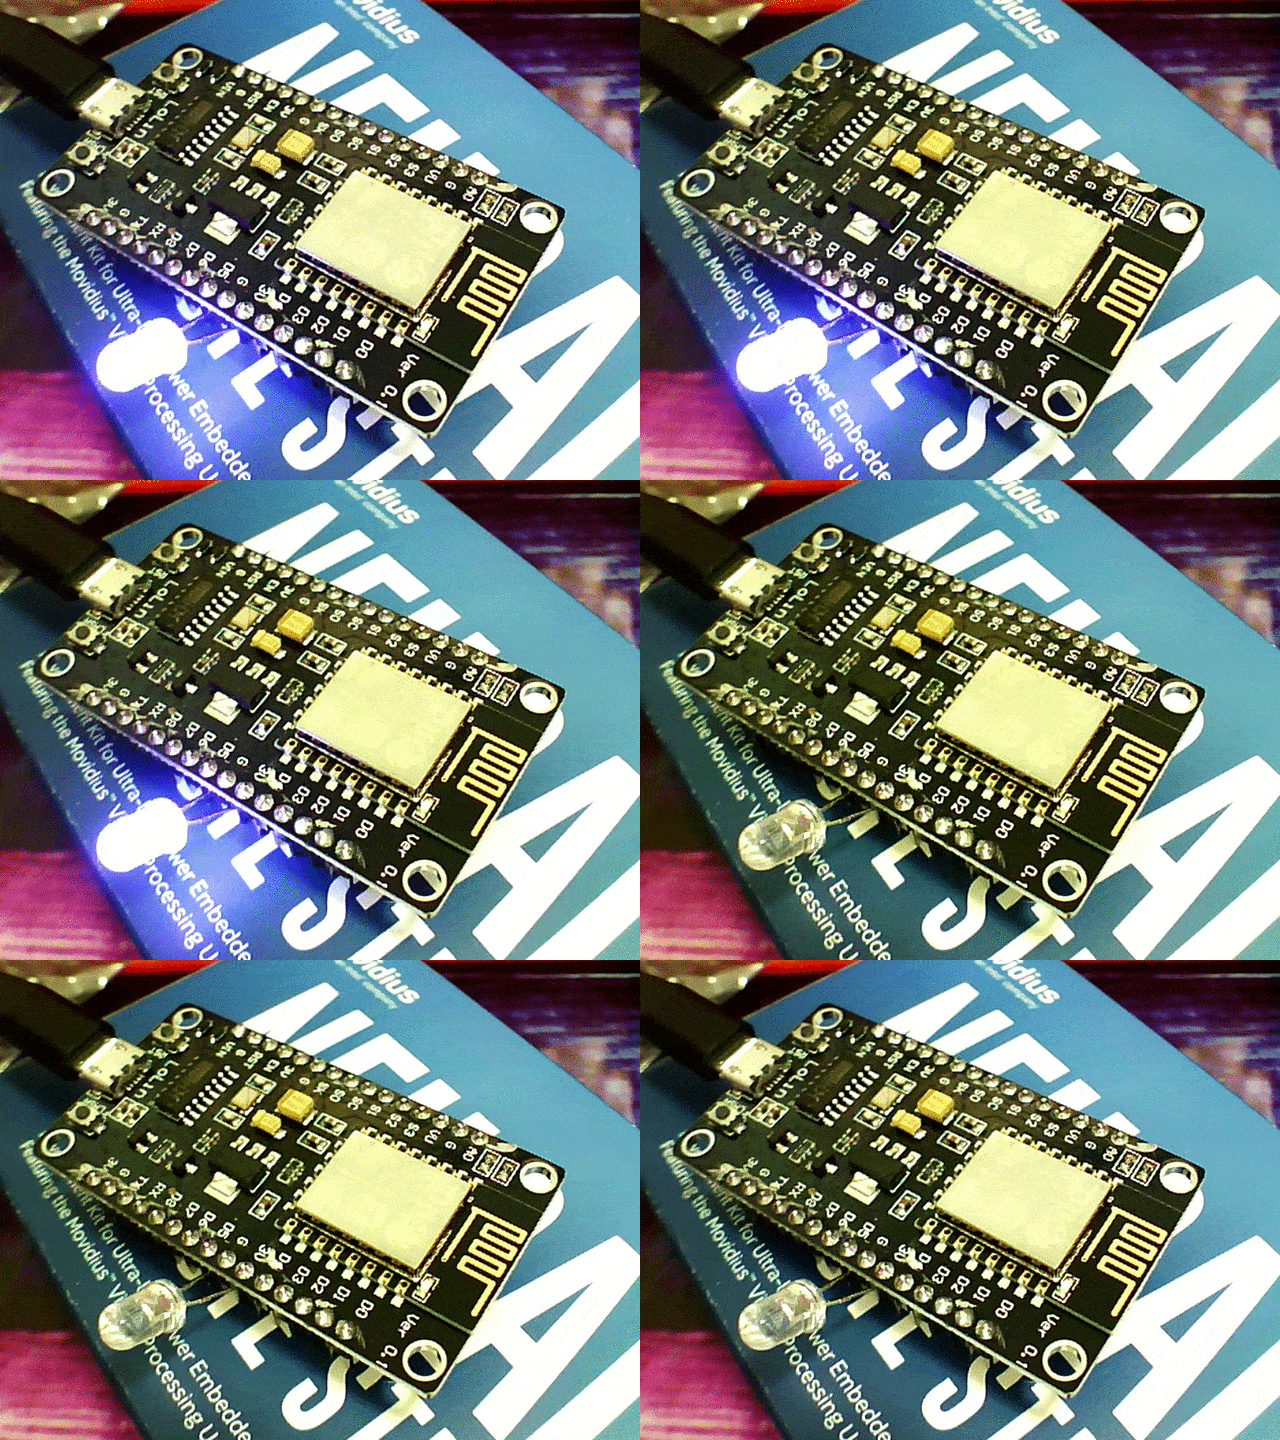
- เลือกเมนู sketch -> verify/compile - เลือกเมนู sketch -> upload - ต่อหลอด led (ขายาว (+)) เข้ากับ GPIO 14 ส่วนขาสั้น (Ground) ต่อลงกราวด์
แสดงผลลัพธ์ดังนี้

 เขียนโปรแกรมส่งข้อมูลผ่านอนุกรมพอร์ตและรับเข้าคอมพิวเตอร์ผ่าน USB2SERIAL ด้วยโปรแกรม putty
1. เขียนโค๊ดและโปรแกรมลง ESP 8266
#include <ESP8266WiFi.h>
#include <SoftwareSerial.h>

SoftwareSerial NodeSerial(D2,D3); // RX, TX

void setup () {
pinMode(D2, INPUT);
pinMode(D3, OUTPUT);
Serial.begin(9600);
NodeSerial.begin(9600);
}

void loop () {
NodeSerial.print(".");
delay(100);
}
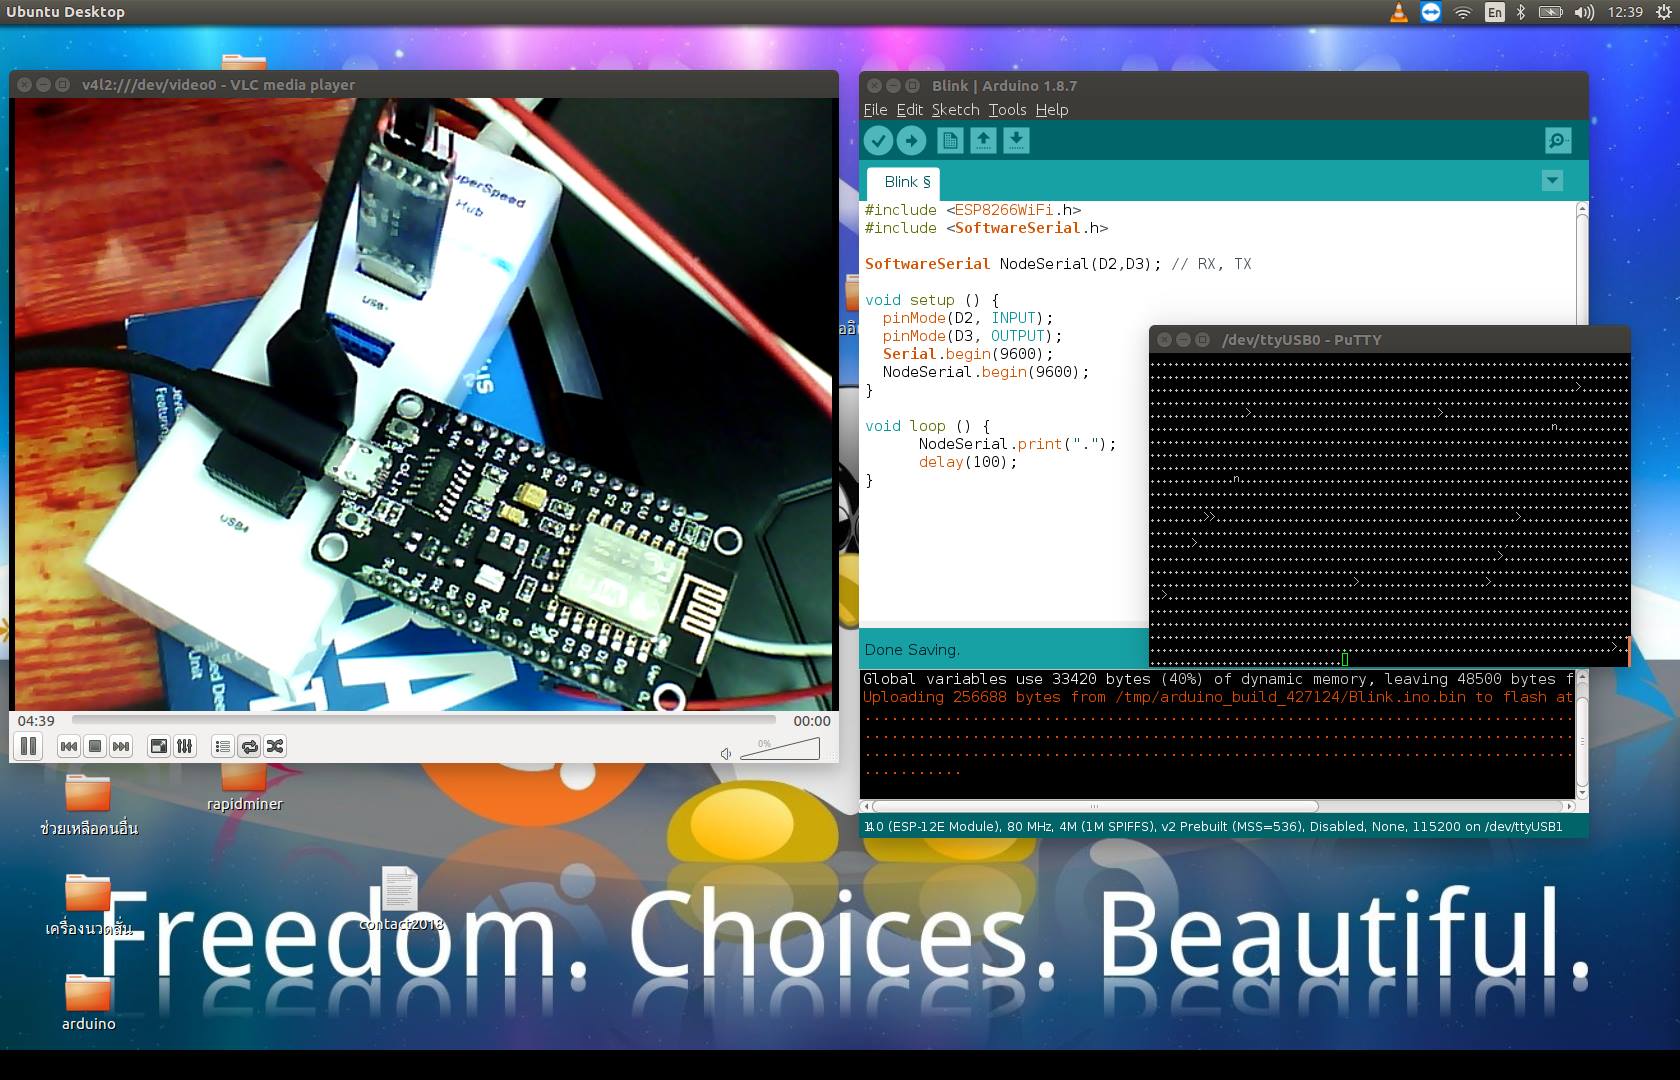
2. ต่อสาย D3 (GPIO0) จาก ESP 8266 ไปยัง RX ของ USB2Serial 3. ต่อสายกราวด์ระหว่าง ESP8266 และ USB2Serial 4. ติดตั้ง putty $ sudo apt-get install putty 5. เลือกสื่อสารแบบ Serial 6. โปรแกรมนี้ส่งจุด (.) ทุก ๆ 100 มิลลิวินาทีผ่านการสื่อสารอนุกรม
แสดงผลลัพธ์ดังนี้

 เขียนโปรแกรมต่ออินเตอร์เน็ตจาก Access Point และส่งข้อมูลไปยัง Server ด้วย ESP8266
1. เขียนโค๊ดและโปรแกรมลง ESP 8266
#include <ESP8266WiFi.h>
#include <ESP8266HTTPClient.h>

const char* ssid = "DSDI";
const char* pass = "123456789";

void setup () {
WiFi.begin(ssid, pass);

while (WiFi.status() != WL_CONNECTED) {
delay(500);
}
}

void loop () {
if (WiFi.status() == WL_CONNECTED) {
HTTPClient http;
String data, url;
data = "?a=" + String(random(300)) + "&b=" + String(random(300));
url = "http://192.168.43.34/update.php" + data;
http.begin(url);
int httpCode = http.GET();
String result = http.getString();
http.end();
delay(3000);
}
}
2. เขียนโปรแกรมฝั่ง server ด้วย php ดังนี้
<? php
$data = serialize($_GET);
file_put_contents("test.txt",$data . "\n", FILE_APPEND);
? >
สรุปการทำงาน
1. ร้องขอการเชื่อมต่ออินเตอร์เน็ตจาก access point โดยส่งค่า SSID และ password ไปด้วย
ปล. SSID คือ ชื่อ WIFI
2. ทำการเขียนสคริปต์แม่ข่าย update.php เพื่อรับค่าข้อมูลจากเมธอด GET เข้ามาเก็บไว้และแปลงเป็น serialize เพื่อเขียนบนไฟล์
3. ทุก ๆ 3 วินาที ให้ส่งข้อมูลไปยังแม่ข่ายหมายเลข พร้อมค่า a และ b ที่สุ่มในช่วง 0-300
ปล. หากต้องการส่งข้อมูลแบบ POST เปลี่ยน http.get() เป็น http.post()
เสร็จแล้วครับ.. สุดยอดจริง ๆ ๆ !!
แสดงผลลัพธ์ดังนี้

 เขียนโปรแกรมทำตัวเองเป็น Access Point (Wifi) และ Web Server
1. การสร้าง Access Point กำหนดชื่อตามต้องการ ในตัวอย่างนี้คือ ESP_8266 รหัสผ่าน 123456789
2. เขียนโค๊ดต่อไปนี้และโปรแกรมลงบน ESP 8266
#include <ESP8266WiFi.h>

const char* ssid = "ESP_8266";
const char* password = "123456789";

WiFiServer server(80);

String header;

const int output5 = 5;
const int output4 = 4;
String output5State = "off";
String output4State = "off";

void setup() {
pinMode(output5, OUTPUT);
pinMode(output4, OUTPUT);

digitalWrite(output5, LOW);
digitalWrite(output4, LOW);
WiFi.mode(WIFI_AP);
WiFi.softAP("ESP_8266");
server.begin();
}

void loop(){
WiFiClient client = server.available();

if (client) {
String currentLine = "";
while (client.connected()) {
if (client.available()) {
char c = client.read();
header += c;
if (c == '\n') {
if (currentLine.length() == 0) {
client.println("HTTP/1.1 200 OK");
client.println("Content-type:text/html");
client.println("Connection: close");
client.println();

if (header.indexOf("GET /5/on") >= 0) {
output5State = "on";
digitalWrite(output5, HIGH);
} else if (header.indexOf("GET /5/off") >= 0) {
output5State = "off";
digitalWrite(output5, LOW);
} else if (header.indexOf("GET /4/on") >= 0) {
output4State = "on";
digitalWrite(output4, HIGH);
} else if (header.indexOf("GET /4/off") >= 0) {
output4State = "off";
digitalWrite(output4, LOW);
}

client.println("<!DOCTYPE html><html>");
client.println("<head><meta charset='utf-8' name=\"viewport\" content=\"width=device-width, initial-scale=1\">");
client.println("<link rel=\"icon\" href=\"data:,\">");
client.println("<style>html { font-family: Helvetica; display: inline-block; margin: 0px auto; text-align: center;}");
client.println(".button { background-color: #195B6A; border: none; color: white; padding: 16px 40px;");
client.println("text-decoration: none; font-size: 30px; margin: 2px; cursor: pointer;}");
client.println(".button2 {background-color: #77878A;}</style></head>");

client.println("<body><h1>เว็บเซิร์ฟเวอร์</h1>");

client.println("<p>GPIO 5 - State " + output5State + "</p>");
if (output5State=="off") {
client.println("<p><a href=\"/5/on\"><button class=\"button\">ON</button></a></p>");
} else {
client.println("<p><a href=\"/5/off\"><button class=\"button button2\">OFF</button></a></p>");
}

client.println("<p>GPIO 4 - State " + output4State + "</p>");
if (output4State=="off") {
client.println("<p><a href=\"/4/on\"><button class=\"button\">ON</button></a></p>");
} else {
client.println("<p><a href=\"/4/off\"><button class=\"button button2\">OFF</button></a></p>");
}
client.println("</body></html>");

client.println();
break;
} else {
currentLine = "";
}
} else if (c != '\r') {
currentLine += c;
}
}
}
header = "";
client.stop();
}
}
3) ใช้คอมพิวเตอร์เชื่อมเข้าไปยัง Access Point ที่ชื่อ ESP_8266 และป้อนรหัสผ่าน
4) เช็คไอพีด้วยคำสั่ง ifconfig พบไอพีของ ESP เป็นเบอร์ 192.168.4.1
5) เข้าไปที่หน้าเว็บ 192.168.4.1
ผลลัพธ์

สรุป
ตอนนี้สามารถทำให้ ESP 8266 กลายเป็น Access Point และยังทำตัวเองเป็น Web Server ได้อีกด้วย สื่อสารกันผ่าน Request ซึ่งนับว่าเป็นความสามารถที่เยี่ยมยอดมาก.. ครับ
 การควบคุมหลอดไฟ 4 ดวงผ่านเว็บ
หัวข้อที่ผ่านมาเป็นการควบคุมหลอดไฟ 2 ดวง ในหัวข้อนี้จะควบคุม 4 ดวง ดังนี้
#include <ESP8266WiFi.h>

const char* ssid = "ESP_8266";
const char* password = "123456789";

WiFiServer server(80);

String header;

const int output1 = 16;
const int output2 = 5;
const int output3 = 4;
const int output4 = 0;
String output1State = "off";
String output2State = "off";
String output3State = "off";
String output4State = "off";

void setup() {
pinMode(output1, OUTPUT);
pinMode(output2, OUTPUT);
pinMode(output3, OUTPUT);
pinMode(output4, OUTPUT);

digitalWrite(output1, LOW);
digitalWrite(output2, LOW);
digitalWrite(output3, LOW);
digitalWrite(output4, LOW);
WiFi.mode(WIFI_AP);
WiFi.softAP("ESP_8266");
server.begin();
}

void loop(){
WiFiClient client = server.available();

if (client) {
String currentLine = "";
while (client.connected()) {
if (client.available()) {
char c = client.read();
header += c;
if (c == '\n') {
if (currentLine.length() == 0) {
client.println("HTTP/1.1 200 OK");
client.println("Content-type:text/html");
client.println("Connection: close");
client.println();

if (header.indexOf("GET /1/on") >= 0) {output1State = "on";digitalWrite(output1, HIGH);}
else if (header.indexOf("GET /1/off") >= 0) {output1State = "off";digitalWrite(output1, LOW);}

else if (header.indexOf("GET /2/on") >= 0) {output2State = "on";digitalWrite(output2, HIGH);}
else if (header.indexOf("GET /2/off") >= 0) {output2State = "off";digitalWrite(output2, LOW);}

else if (header.indexOf("GET /3/on") >= 0) {output3State = "on";digitalWrite(output3, HIGH);}
else if (header.indexOf("GET /3/off") >= 0) {output3State = "off";digitalWrite(output3, LOW);}


else if (header.indexOf("GET /4/on") >= 0) {output4State = "on";digitalWrite(output4, HIGH);}
else if (header.indexOf("GET /4/off") >= 0) {output4State = "off";digitalWrite(output4, LOW);}


client.println("<!DOCTYPE html><html>");
client.println("<head><meta charset='utf-8' name=\"viewport\" content=\"width=device-width, initial-scale=1\">");
client.println("<link rel=\"icon\" href=\"data:,\">");
client.println("<style>html { font-family: Helvetica; display: inline-block; margin: 0px auto; text-align: center;}");
client.println(".button { background-color: #195B6A; border: none; color: white; padding: 16px 40px;");
client.println("text-decoration: none; font-size: 30px; margin: 2px; cursor: pointer;}");
client.println(".button2 {background-color: #77878A;}</style></head>");

client.println("<body><h1>เว็บเซิร์ฟเวอร์</h1>");

client.println("<p>Switch 1 - State " + output1State + "</p>");
if (output1State=="off") {
client.println("<p><a href=\"/1/on\"><button class=\"button\">ON</button></a></p>");
} else {
client.println("<p><a href=\"/1/off\"><button class=\"button button2\">OFF</button></a></p>");
}

client.println("<p>Switch 2 - State " + output2State + "</p>");
if (output2State=="off") {
client.println("<p><a href=\"/2/on\"><button class=\"button\">ON</button></a></p>");
} else {
client.println("<p><a href=\"/2/off\"><button class=\"button button2\">OFF</button></a></p>");
}

client.println("<p>Switch 3 - State " + output3State + "</p>");
if (output3State=="off") {
client.println("<p><a href=\"/3/on\"><button class=\"button\">ON</button></a></p>");
} else {
client.println("<p><a href=\"/3/off\"><button class=\"button button2\">OFF</button></a></p>");
}


client.println("<p>Switch 4 - State " + output4State + "</p>");
if (output4State=="off") {
client.println("<p><a href=\"/4/on\"><button class=\"button\">ON</button></a></p>");
} else {
client.println("<p><a href=\"/4/off\"><button class=\"button button2\">OFF</button></a></p>");
}
client.println("</body></html>");

client.println();
break;
} else {
currentLine = "";
}
} else if (c != '\r') {
currentLine += c;
}
}
}
header = "";
client.stop();
}
}
 เขียนโปรแกรม บันทึกข้อมูลลงใน EEPROM
1. ขอใช้ #include < EEPROM.h >
2. สร้างฟังก์ชั่นอ่าน EEPROM_read()
String EEPROM_read(int index, int length) {
String text = "";
char ch = 1;

for (int i = index; (i < (index + length)) && ch; ++i) {
if (ch = EEPROM.read(i)) {
text.concat(ch);
}
}
return text;
}
3. สร้างฟังก์ชั่นเขียน EEPROM_write()
int EEPROM_write(int index, String text) {
for (int i = index; i < text.length() + index; ++i) {
EEPROM.write(i, text[i - index]);
}
EEPROM.write(index + text.length(), 0);
EEPROM.commit();

return text.length() + 1;
}
4. เขียนข้อมูลและอ่านข้อมูลผ่าน EEPROM
EEPROM.begin(512);
len = EEPROM_write(address, "DSDI|123456789");
NodeSerial.println(EEPROM_read(address, len));

5. ตอนนี้เขียน SSID และรหัสผ่านลง EEPROM ดังนี้
"DSDI|123456789"
6. โค๊ดเต็มเขียนดังนี้
#include <ESP8266WiFi.h>
#include <SoftwareSerial.h>
#include <EEPROM.h>

int address = 0;

String EEPROM_read(int index, int length) {
String text = "";
char ch = 1;

for (int i = index; (i < (index + length)) && ch; ++i) {
if (ch = EEPROM.read(i)) {
text.concat(ch);
}
}
return text;
}

int EEPROM_write(int index, String text) {
for (int i = index; i < text.length() + index; ++i) {
EEPROM.write(i, text[i - index]);
}
EEPROM.write(index + text.length(), 0);
EEPROM.commit();

return text.length() + 1;
}

SoftwareSerial NodeSerial(D2,D3); // RX, TX
int len;

void setup () {
pinMode(D2, INPUT);
pinMode(D3, OUTPUT);
Serial.begin(9600);
NodeSerial.begin(9600);

EEPROM.begin(512);
len = EEPROM_write(address, "DSDI|123456789");
NodeSerial.println(EEPROM_read(address, len));
}

void loop () {

}
สรุป :
- การเขียนข้อมูลลงบน EEPROM เป็นช่วยให้ระบบสามารถเก็บการตั้งค่าต่าง ๆ ลงในตัวมันเองได้ เช่น เมื่อต้องการให้ตัวมัน ออกเน็ตได้ ก่อนอื่นให้ผู้ใช้ป้อน SSID และ Password จากนั้นมันจะใช้ค่าดังกล่าว ในการเอาไปตั้งค่าอินเตอร์เน็ต เพื่อทำให้ตัวมันเองออกเน็ตได้.. สุดยอดมากครับ
 การเขียนโปรแกรม ใช้งาน JSON ใน ESP8266
1. เลือกเมนู Sketch -> Include Libraries -> Manage Libraries
- ป้อนคำค้นคำว่า arduinojson ลงไปและทำการติดตั้ง
ปล. ตัวอย่างนี้ใช้เวอร์ชั่น 5.13.4
2. ที่ซอร์สโค๊ดประกาศ header
# include < ArduinoJSON.h >
3. สร้าง ตัวแปร json มีชนิดเป็น JsonObject
StaticJsonBuffer<200> jsonBuffer;
JsonObject& json = jsonBuffer.createObject();
json["ssid"] = "DSDI";
json["pass"] = "123456789";
json.printTo(NodeSerial);
4. โค๊ดสมบูรณ์
#include <ESP8266WiFi.h>
#include <SoftwareSerial.h>
#include <EEPROM.h>
#include <ArduinoJson.h>

int address = 0;

String EEPROM_read(int index, int length) {
String text = "";
char ch = 1;

for (int i = index; (i < (index + length)) && ch; ++i) {
if (ch = EEPROM.read(i)) {
text.concat(ch);
}
}
return text;
}

int EEPROM_write(int index, String text) {
for (int i = index; i < text.length() + index; ++i) {
EEPROM.write(i, text[i - index]);
}
EEPROM.write(index + text.length(), 0);
EEPROM.commit();

return text.length() + 1;
}

SoftwareSerial NodeSerial(D2,D3); // RX, TX

void setup () {
pinMode(D2, INPUT);
pinMode(D3, OUTPUT);
Serial.begin(9600);
NodeSerial.begin(9600);

StaticJsonBuffer<200> jsonBuffer;
JsonObject& json = jsonBuffer.createObject();
json["ssid"] = "DSDI";
json["pass"] = "123456789";
json.printTo(NodeSerial);
}

void loop () {

}
5. ตอนนี้เขียนข้อมูลเก็บใน JSON ได้แล้ว
ปล. JSON เป็นโครงสร้างข้อมูลที่สามารถทำ Serialize ให้อยู่ในรูปของสตริง และแปลงตัวแปรที่อยู่ในรูปสตริงกลับเป็นตัวแปรจริง ๆ ได้ มีประโยชน์และใช้บ่อยมาก
 การ unserialize ทำได้ดังนี้
char text[] = "{\"ssid\": \"DSDI\",\"pass\": \"123456789\",\"data\":[100,200]}";

StaticJsonBuffer<200> jsonBuffer;

JsonObject& json = jsonBuffer.parseObject(text);

const char* ssid = json["ssid"];
const char* pass = json["pass"];
double latitude = json["data"][0];
double longitude = json["data"][1];

NodeSerial.print(ssid);
NodeSerial.print(pass);
สรุป ตอนนี้สามารถใช้งาน JSON ใน ESP8266 ได้แล้วครับ ต่อไปก็นำเอาค่า JSON พวกนี้ล่ะเก็บไว้ใน EEPROM ก็ได้ เวลาจะใช้ก็ทำ Unserialize ก็จะได้ตัวแปรกลับคืนมาและใช้ประโยชน์ต่อไปได้
 งานตีพิมพ์ IEEE 2017 ต้นแบบการตรวจจับอัตราเต้นหัวใจด้วย ESP8266

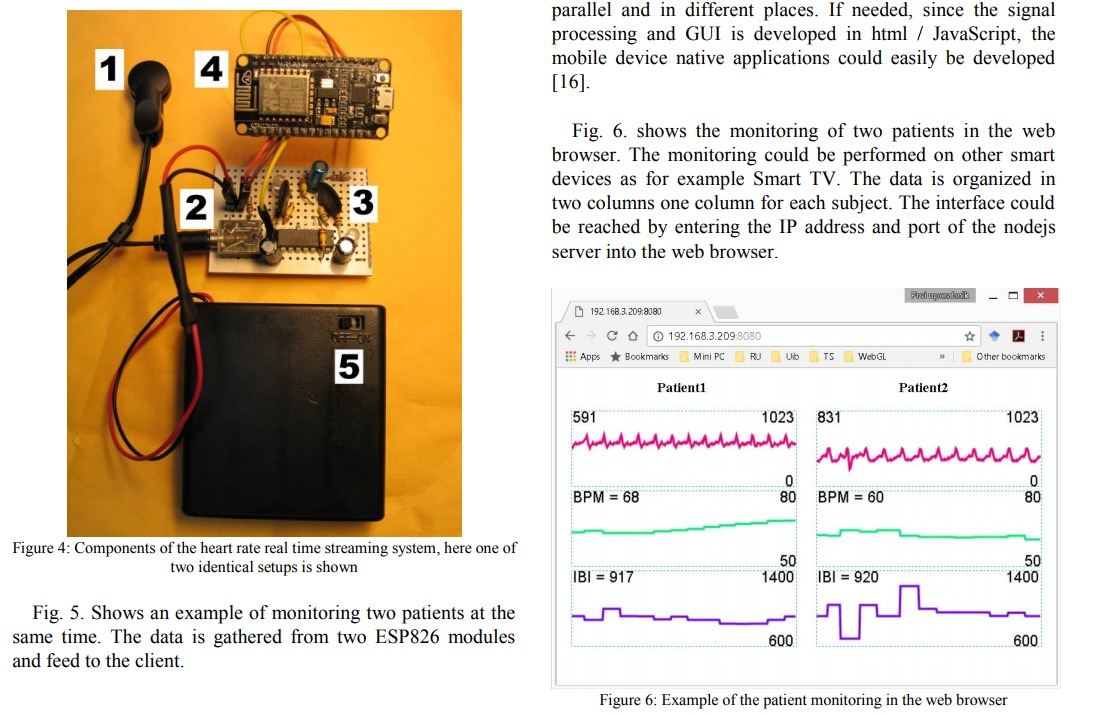
- บทความนี้อธิบายการพัฒนาต้นแบบที่ทำให้สามารถตรวจสอบอัตราการเต้นหัวใจและช่วงจังหวะการเต้นหัวใจ
- ต้นแบบใช้ ESP2866 โมดูลและใช้ websocket library , nodejs, javascript
- สถาปัตยกรรม คือ nodejs เป็น server ทำนหน้าที่เป็นตัวจัดการสัญญาณข้อมูลและกราฟิกอินเตอร์เฟสสำหรับลูกข่าย
- อัลกอริทึมประมวลสัญญาณพัฒนาด้วย javascript
- กราฟิกอินเตอร์เฟสสามารถใช้ในสมาร์ตโฟนได้
- รายละเอียดแสดงการติดต่อระหว่าง esp8266 , แม่ข่าย และลูกข่าย
- การพัฒนานี้แสดงให้เห็นว่าสามารถนำไปใช้งานจริงได้
ดาวน์โหลดบทความ : http://dsdi.msu.ac.th/articles/esp8266/07977151.pdf
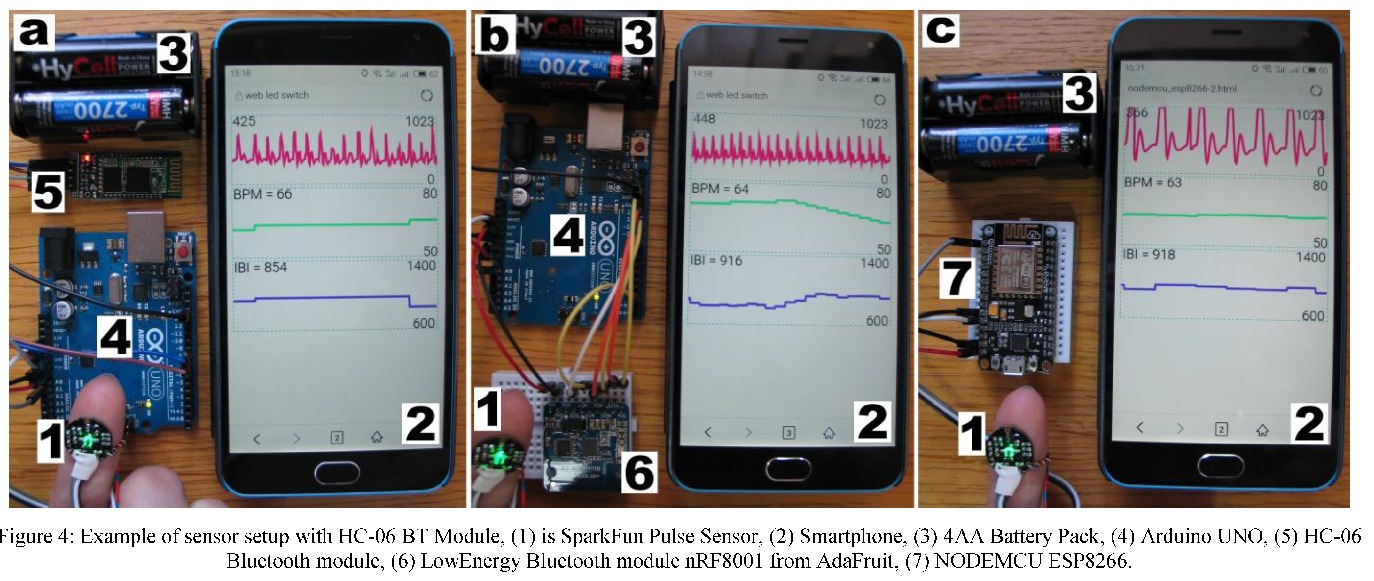
 งานตีพิมพ์ IEEE 2016 การสตรีมข้อมูลไปยังคลาวด์คอมพิวเตอร์ด้วย Bluetooth LE หรือ NodeMCU ESP8266

- บทความนี้อธิบายการพัฒนาต้นแบบ 3 ส่วนที่จะตรวจสอบเซ็นเซอร์วัดการเต้นหัวใจบนคลาวด์คอมพิวเตอร์
- ต้นแบบทำงานบน 1) Bluetooth module 2) Low Energy Bluetooth module และ 3) ESP8266 Wifi-module
- การพัฒนาฝั่งลูกข่ายใช้ javascript
- Node.js ใช้บนแม่ข่ายและต่อกับ RS232 ผ่าน Bluetooth modules.
- พบว่า ESP8266 ข้อมูลจะส่งถ่ายได้โดยตรงไปยังคลาวด์คอมพิวเตอร์
- ความแตกต่างระหว่างต้นแบบทั้ง 3 เมื่อเปรียบเทียบการบริโภคพลังงานและความซับซ้อนในการออกแบบ
- ตัวอย่างโค๊ดแสดงวิธีการพัฒนาบนคลาวด์ ที่ทำงานกับการมอเตอร์ข้อมูลไบโอด้วยโมบาย
ดาวน์โหลดบทความ : http://dsdi.msu.ac.th/articles/esp8266/07525798.pdf